Your settings
Settings hold the choices that apply to your whole company: the kinds of work you do, your deposit, your terms, how your email looks, who can sign in, and your plan. Only admins can open them.
Where settings are
Press Settings in the menu, or the gear at the top right. Only admins see them. Settings has eight tabs:
| Tab | What is on it |
|---|---|
| Estimates & payments | Kinds of work, Stripe payments, sales tax, website leads, requests from people nearby, customer notices, weather, deposit, estimate terms. |
| Service agreement | What a customer signs after accepting the estimate. |
| Company & branding | Your business name, logo, colors and letterhead. |
| Who customer email comes from and where replies go. | |
| Team | The people in your company who can sign in, and their role. |
| Subscription | Your plan, your trial and your card. |
| QuickBooks | Connect QuickBooks so paid invoices are added to your books. See QuickBooks. |
| Signed-in devices | The phones and computers that stay signed in, and a way to sign them out. |

Add or remove a kind of work
Your kinds of work decide which screens you see and which services you can quote. They are at the top of the Estimates & payments tab.
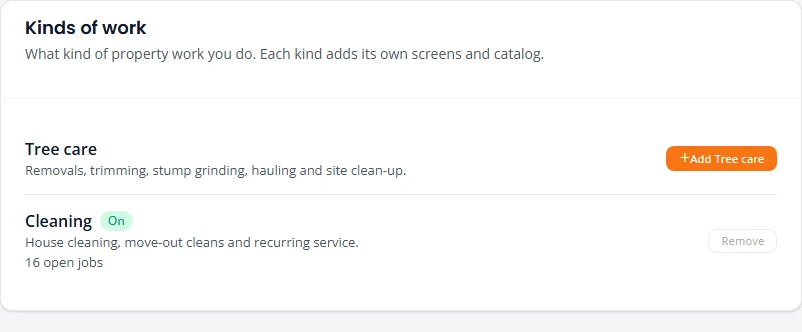
Add a kind
- Under Kinds of work, find the kind you want.
- Press its Add button, such as Add Snow removal or Add Handyman.
Its screens appear in the menu, and it gets its own catalog with a starter list of services at suggested prices. Change them to your rates before you quote.
Remove a kind
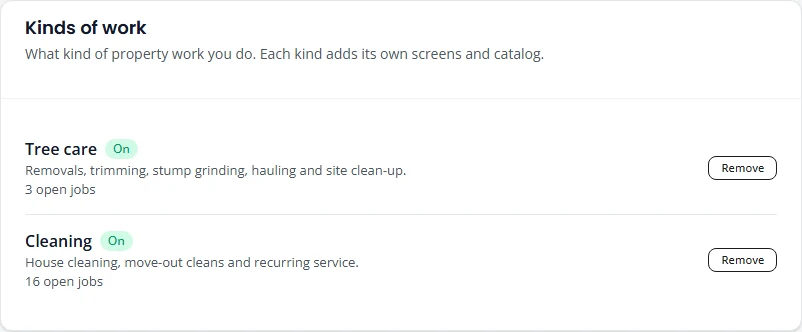
- Press Remove beside the kind.
- Read the message and press Remove to confirm.
Deposit and estimate defaults
On the Estimates & payments tab, under Deposit & payment:
| Setting | What it does |
|---|---|
| Do you take a deposit? | Yes, or no deposit with payment in full when the work is done. |
| Deposit amount | A percent of the total, or a fixed dollar amount. A blank percent means 50%. |
| When is it due? | Before the job is scheduled, when the estimate is accepted, or on the day of service. |
| What customers are told after they sign | The next step shown on the thank-you page and in the signed-copy email. |
| Estimates are valid for (days) | How long a customer has to accept. Blank means 30 days. |
| Job number prefix | The letters at the start of new job numbers. Existing numbers do not change. |
| Time zone | The time zone every schedule screen shows times in, for everyone in your company. Also sets the times in crew reminders and what counts as tomorrow in your Action Queue. |
Press Save deposit & defaults when you are done. The deposit percent and the valid-for days are starting points. You can change both on any single estimate.
Customer notices
The Customer notices card on the Estimates & payments tab decides which emails your customers get about their appointments. Turn each one on or off:
- Appointment booked, moved or cancelled. Sent a couple of minutes after the visit is scheduled or changed, with the date and time window.
- Reminder the evening before. Sent at 5 PM your time the day before the visit.
- Crew is on the way. Sent when the crew presses On my way, with the crew member’s photo and an arrival estimate.
- Include a job status link. Adds a private page where the customer can see if the crew is scheduled, on the way, on site or done.
- Also text customers who agreed to texts. Sends the same notices by text, only to customers who agreed. They can reply STOP at any time.
The same card holds your Google review link and the review request choices. See Ask for reviews.
Weather
Tick Weather can delay our work on the Weather card. Every morning at 9 Northfork Trades checks the jobs scheduled through tomorrow. If storms, heavy rain or snow, strong wind, ice, or extreme cold or heat are forecast while the crew is there, you get an email listing those jobs.
Tick Also text the customer a heads-up to text customers who agreed to texts. The text says the weather may affect the visit and that you will contact them if it has to move. Snow removal visits are never flagged. Press Save.
The card lists the jobs flagged so far, with the weather and who was told.
Website leads
The Website leads card on the Estimates & payments tab connects the quote form on your website to Northfork Trades. Each request your website sends becomes a New Lead on your board, and your admins get an email about it. See A request from your website.
Create a key
A website key is a secret code your website uses to send you requests. Give each website its own key.
- Under New key name, type the website it is for, such as yourcompany.com.
- Press Create key.
- The key is shown once. Press Copy key and keep it somewhere safe, or press Copy example to copy a ready-made example with the key in it for your web developer. Then press Done.
The list shows each key’s name, its first few characters, when it was created and last used, and whether it is Active or Revoked.
Give it to your web developer
Press Setup for your web developer. It shows the address your form sends to, an example, and the fields Northfork Trades accepts. Send that to whoever looks after your website, with the key. The key must be kept on the website’s server, not in the page itself.
Revoke a key
If a key may have leaked, or you take a website down, press Revoke beside it and confirm. That website stops sending leads at once. Create a new key and give it to your web developer.
Requests from people nearby
Northfork has a public page where people ask for help, such as “plow my driveway this winter”. If you turn this on, requests near you for your kinds of work land on your board as a New Lead. Each request goes to at most 3 companies, nearest first.
- On the Requests from people nearby card, tick Send me requests from people nearby.
- Type the Address you work from and how far you travel, in Travel (miles).
- Press Save.
The person sees your company name and how far away you are, and you contact them directly. The request page is linked as “Find a local pro” at the bottom of the Northfork Trades website.
Your terms
Your terms print on the estimate and show on the page where the customer signs. They are on the Estimates & payments tab, under Estimate terms.
- To start from our wording, pick General, Tree service or Cleaning under Start from a template and press Use template.
- Under Masthead, check your company name and add a tagline if you want one.
- Under Terms & Conditions, edit each clause. Use the buttons beside a clause to move it up or down or to remove it, and Add clause to write your own.
- Check the Signature page wording.
- Press Save terms.
Service agreement
A service agreement is a second document the customer signs after accepting the estimate, such as your cleaning policies. You do not need one: the estimate and its terms are enough for many jobs.
- Open the Service agreement tab.
- Under Start from, pick Tree service (scope and price, then your estimate terms word for word) or Cleaning (scope, price, payment, minimum charge, cancellation, re-clean guarantee, access and pets).
- Press Create agreement, then read and edit the wording.
The list shows each agreement, when it last changed, and whether its wording is Ready. Once you have one, a job offers Send agreement after the customer accepts the estimate.
Company and branding
The Company & branding tab holds your business name, logo, colors, and the business details printed in the footer of customer emails.
Change your business name
Your Business name is shown on your estimates, agreements, invoices and customer emails. Change it at the top of the tab and press Save name.

Logo and colors
The steps are in Add your name, logo and colors.
- To swap your logo, press Replace logo. To go back to no logo, press Remove.
- To go back to the standard colors, press Use default beside a color.
- Under Letterhead you can set how your logo and contact details sit at the top of printed documents, or press Import from Word to copy the letterhead from a Word document you already use.
The Email tab controls how email to your customers is addressed.
- Customers currently see shows the From and Reply-To on your email right now.
- From name. The name customers see. Blank uses your company name.
- Reply-To. Where customer replies go. Set this to an inbox you read.
- Send test email. Sends a sample to your own address.
- Recent sends lists what has gone out. Suppressed addresses lists addresses that bounced or marked your email as spam. We do not send to those.
Send from your own domain
To start with, email goes out as “Your Company via Structra”. To send from your own address instead:
- Under Sending domain, type your domain and press Add domain. A subdomain such as mail.yourcompany.com keeps this apart from your everyday email.
- Add the DNS records shown to your domain. Whoever set up your website or email can do this for you.
- Press Verify now. DNS changes can take a few minutes to show.
Team
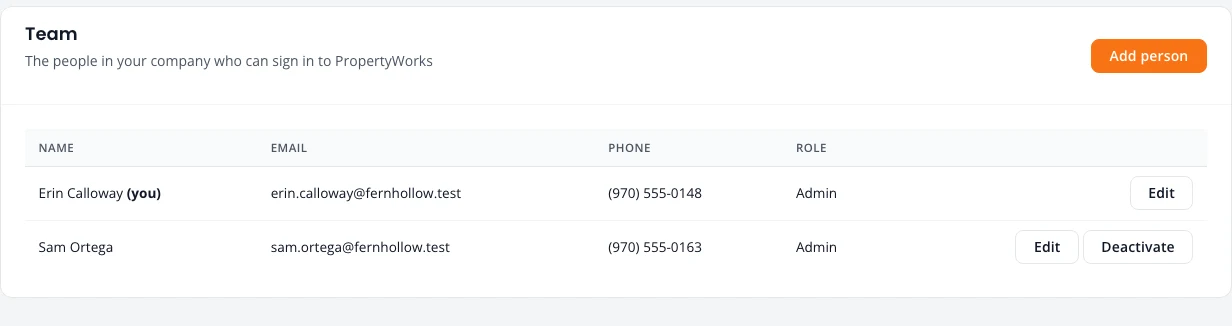
The Team tab lists the people in your company who can sign in to Northfork Trades. Each person has one of two roles:
- Admin can change settings and billing, ask for reviews, and do everything else.
- Team member works with jobs, the schedule and customers, but does not see Settings.
Add someone
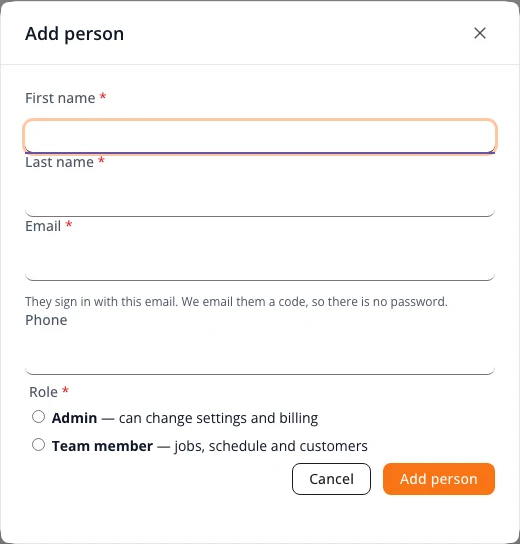
- Press Add person.
- Fill in First name, Last name and Email. Phone is optional, but they need it to get sign-in codes by text.
- Choose a Role, then press Add person.
They get an email saying they have been added to your company on Northfork Trades, with a link to sign in. They sign in with a code sent to that email, so there is no password to set.
Change a role, or stop someone signing in
- Press Edit beside the person to change their name, phone or role. Their email cannot be changed.
- Press Deactivate and confirm to stop them signing in. Nothing is deleted, and Reactivate lets them back in.
Subscription
The Subscription tab shows your Current plan, how many days are left in your trial, how many users you have out of the number your plan allows, and how you pay.
- Under Choose a plan, switch between Monthly and Annual to compare.
- Press the button on the plan you want, such as Choose Solo, or Subscribe to Crew to keep the plan you are trying.
- Enter your card on Stripe’s secure checkout page.
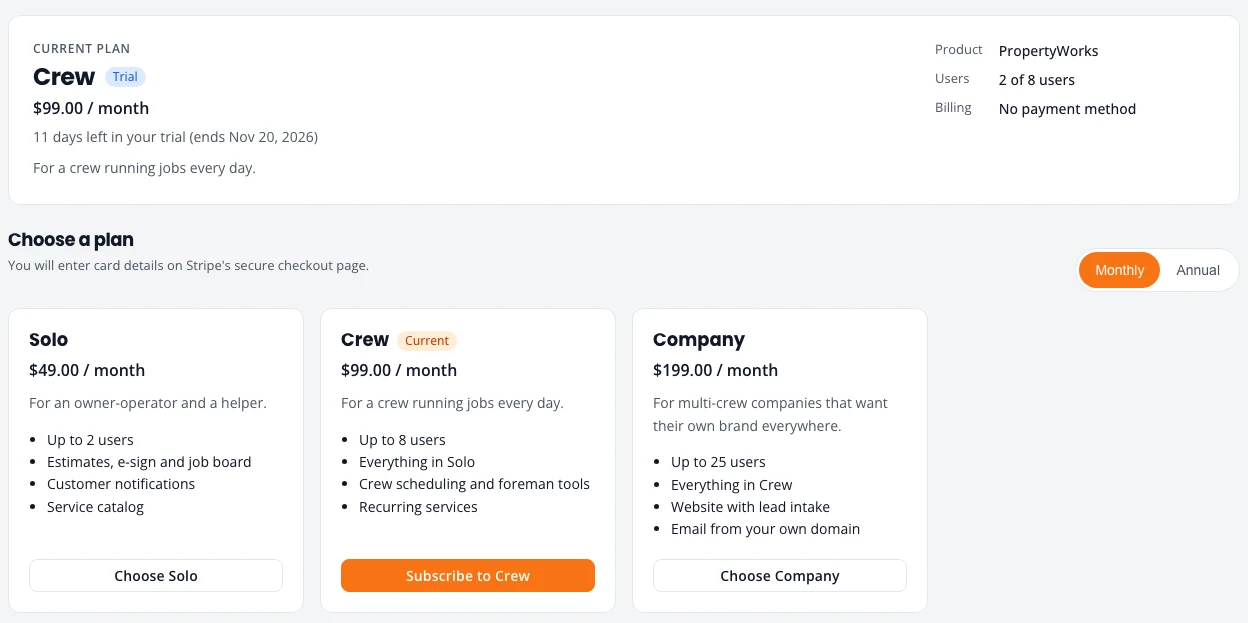
Once you have a card on file, press Manage billing to change your plan, update your card, download invoices or cancel. Plans and prices are on the pricing page.
Signed-in devices
Once you sign in on a phone, tablet or computer, it stays signed in, so you are not asked for a code every day. It stays signed in for up to a year, or until it goes 90 days without being used.
The Signed-in devices tab lists every device signed in for your company, with who it belongs to and when it was last used. Press Sign out beside a lost or old device, or Sign out my other devices to sign out everywhere but where you are now.
Without signal
On a device that stays signed in, the jobs, schedule, customers and prices you last opened are kept on the device for a few days. Without signal you can still read them. A bar at the top says when they were saved. Sending, payments and saving changes wait until you are back online.
Stuck on something? Email support@structra.tech and tell us what you were trying to do.